Using the AprilTags Glyph Recognition System
|
The Apriltags system is capable of multi-marker recognition. |
The following tutorial will help users recognize AprilTag glyphs.
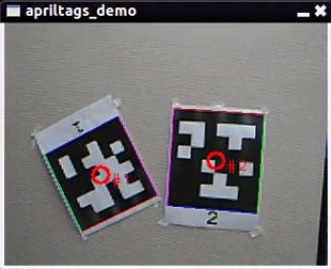
The demo system for AprilTags will allow you to recognize multiple markers and obtain their x, y, and z position as well as their roll, pitch, and yaw.
Contents
Prerequisites: Ubuntu
Our tutorials were made using Ubuntu 12.04 LTS.
Getting the AprilTag Recognition Code
Source: http://people.csail.mit.edu/kaess/apriltags/
Run the following commands to get the AprilTag Recognition code:
sudo apt-get install subversion cmake libopencv-dev libeigen3-dev libv4l-dev
sudo port install pkgconfig opencv eigen3
svn co https://svn.csail.mit.edu/apriltags
   cd apriltags
   make
Printing Tags
In order to recognize the tags, you must first print them. We will be using the tag36h11 family. You can download the png files for this family here.
Now to print a tag, do the following:
1. Untar the tag36h11.tgz file you downloaded
2. Run gimp on one of the png files, e.g., "gimp tag36_11_00000.png"
3. From the pulldown menu, select Image > Scale Image
4. Set the units to inches and the size to your desired tagsize (this tagsize is the length of a side of the tag you wish to print). 3 to 5 inches is a reasonable tagsize.
5. Set the Interpolation mode to None
6. Click on the Scale button
7. From the pulldown menu, select File > Save As
8. Save the image as a PostScript file, e.g., /tmp/tag0.ps
9. Send the PostScript file to your printer
Source: http://wiki.tekkotsu.org/index.php/AprilTags#Printing_Your_Own_AprilTags
Edit the demo to suit your needs
TODO
