Tutorial (Catenary)
Contents
Materials Needed
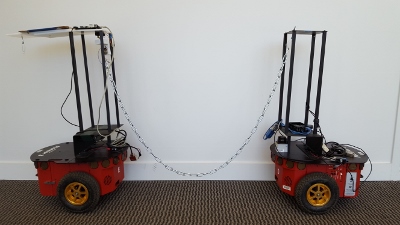
Two P3DXs, Two Raspberry PI 2 Model B V1.1, Two microSD cards (both have to be same size; 32GB and 32GB) for the Raspberry Pis, two wifi adapters (we used Trendnet TEW-648UBM wireless adapters fro MicroCenter), a 60 inch chain from HomeDepot
Setup the PI
1. Flash the microSD card using the image file from this link: image link
After you download the zip file from the provided link, extract it to get the image file.
To write the image on the microSD card, we used the software Win32Disk Disk Imager, which can be downloaded from this link: Win32 Link
Once downloaded, install Win32 and run it. Then click the folder icon to locate and select the image file that was previously downloaded. Now make sure that the microSD card is inserted at this point. Then on the device drop-down menu, select the name/directory of the microSD card. Finally click the write button to start writing the image onto the card. It will take a while to write, so take a break and grab a donut.
2. After the image has been written on the microSD card, insert the card in the Raspberry Pi 2. Also, connect the wireless adapter to the Pi. Finally, connect the Pi to a power source via the microUSB port.
If the wireless adapter does not turn on or connect to network, follow these steps:
Since we cannot ssh to pi from our computer because the wifi adapter is not working, connect the pi to an lcd monitor via HDMI and boot it up there.
2. Once booted, login with the username rpi2 and password (not shown here. Ask people at the lab).
3. Then on the terminal go to the root directory, and edit the network interface file:
cd ~/
nano /etc/network/interfaces
Install RPi.GPIO 0.6.2 module on the Pi
We need to install this module in order to read the GPIO pins on the pi so that we can get the digital potentiometer values being sent from the MCP3008 ADC.
To install the RPI.GPIO module enter this on the pi terminal:
pip install https://pypi.python.org/packages/source/R/RPi.GPIO/RPi.GPIO-0.6.2.tar.gz
Setup MCP3008 with the Pi
Follow this PDF: MCP3008 setup link
This video is also helpful: MCP3008 and Pi setup video
Download the necessary files from Github
git clone https://github.com/adriancabal/VanguardUAVSeniorDesign.git
After downloading the directory, move the necessary bash python files to the home directory. For the first P3DX pi, move the files from the folder named rpi1. For the second P3DX copy the files from the folder named rpi2. On the first P3DX pi, the otherthing file should have rosrun keyboardRealMover.py uncommented. To edit the otherthing files, do this:
nano otherthing
Running the P3DXs
1. Now you should have a raspberry pi on each P3DX. On your terminal, ssh to both Pis. For each Pi, you will actually need to open multiple tabs on the terminal.
ssh rpi2@192.168.(address of the 1st pi)
Once logged in, run . master:
. master
Open a new tab on the same terminal window, again ssh to the 1st pi, and run the otherthing script:
. otherthing
Again open a new tab on the same terminal window, again ssh to the 1st pi, and run the rosa script:
. rosa
Now you should be able to control the 1st P3DX using the keyboard arrow keys. Make sure that you are currently on the tab which is running the otherthing script and keyboardRealMover.py in order to be able to move the P3DX.
Running the second P3DX
Open a new terminal:
ssh rpi2@192.168.(address of the 2nd pi)
