Difference between revisions of "Hand Construction"
(→Right Hand:) |
|||
| Line 6: | Line 6: | ||
3D Printed Parts: | 3D Printed Parts: | ||
| + | |||
| + | 5x Finger Plate | ||
| + | 1x Right Thumb Knuckle | ||
| + | 2x Knuckle Plate | ||
| + | 1x XL-320 Servo Holster | ||
| + | 3x Finger Tip | ||
| + | |||
| + | Machined Parts: | ||
| + | |||
| + | 1x Hand Plate | ||
| + | |||
| + | Additional Parts: | ||
| + | |||
| + | 11x XL-320 Dynamixel Servo | ||
| + | 54x White XL-320 Pegs | ||
| + | 24x Grety XL-320 Pegs | ||
| + | 2x 4mm x 30mm screws | ||
| + | 4x 4mm x 36mm screws | ||
| + | 2x 4mm x 5mm screws | ||
| + | 8x 4mm nuts | ||
| + | |||
| + | |||
| + | ==== Fingers ==== | ||
| + | |||
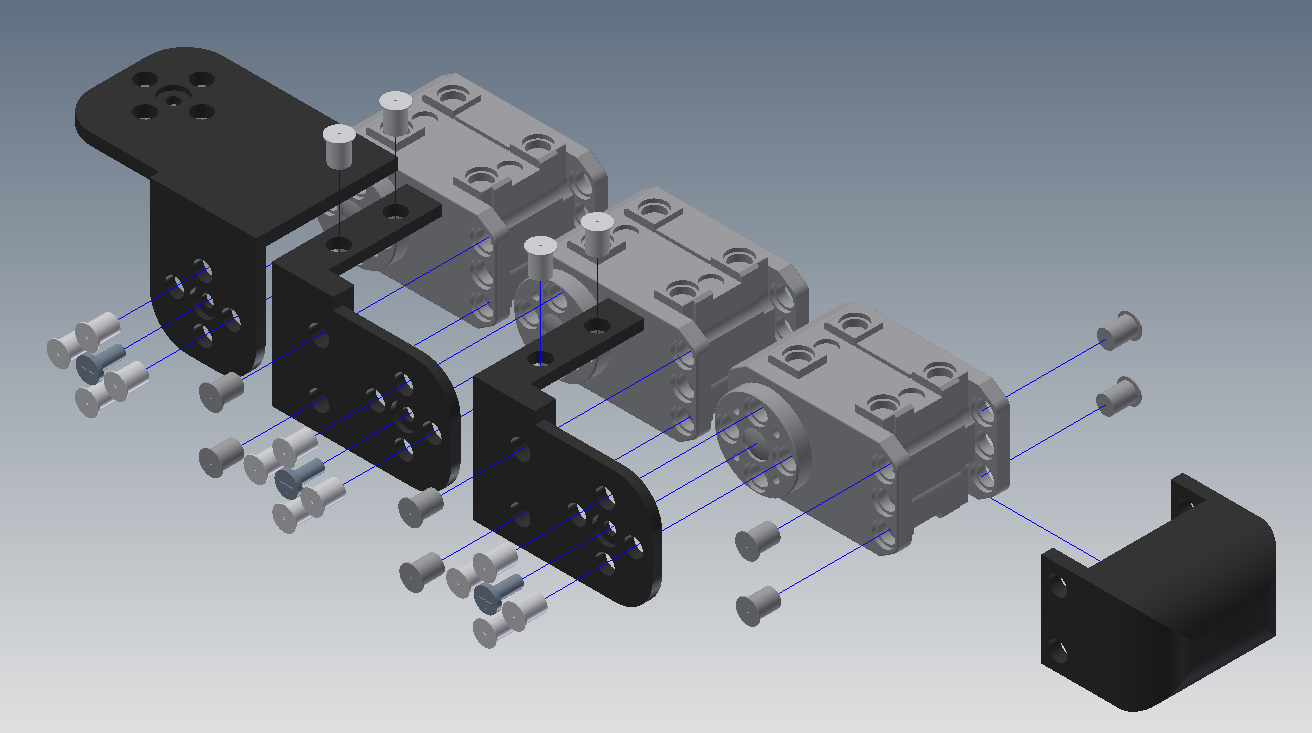
| + | The first thing to be done is remove the screw in the center of each XL-320 Dynamixel. Then assemble the fingers as shown in the diagrams below. There are 4 fingers total for both hands, two per hand. | ||
| + | |||
| + | [[File: Finger assembly.PNG]] | ||
Revision as of 04:30, 11 May 2016
Required Parts
The construct the hand you will require both 3D printed parts and machined parts. You can find the 3D printing tutorial here and the Machining Tutorial here. All required files for part creation can be found here. For the hand you will need to make the following parts:
Right Hand:
3D Printed Parts:
5x Finger Plate 1x Right Thumb Knuckle 2x Knuckle Plate 1x XL-320 Servo Holster 3x Finger Tip
Machined Parts:
1x Hand Plate
Additional Parts:
11x XL-320 Dynamixel Servo 54x White XL-320 Pegs 24x Grety XL-320 Pegs 2x 4mm x 30mm screws 4x 4mm x 36mm screws 2x 4mm x 5mm screws 8x 4mm nuts
Fingers
The first thing to be done is remove the screw in the center of each XL-320 Dynamixel. Then assemble the fingers as shown in the diagrams below. There are 4 fingers total for both hands, two per hand.
