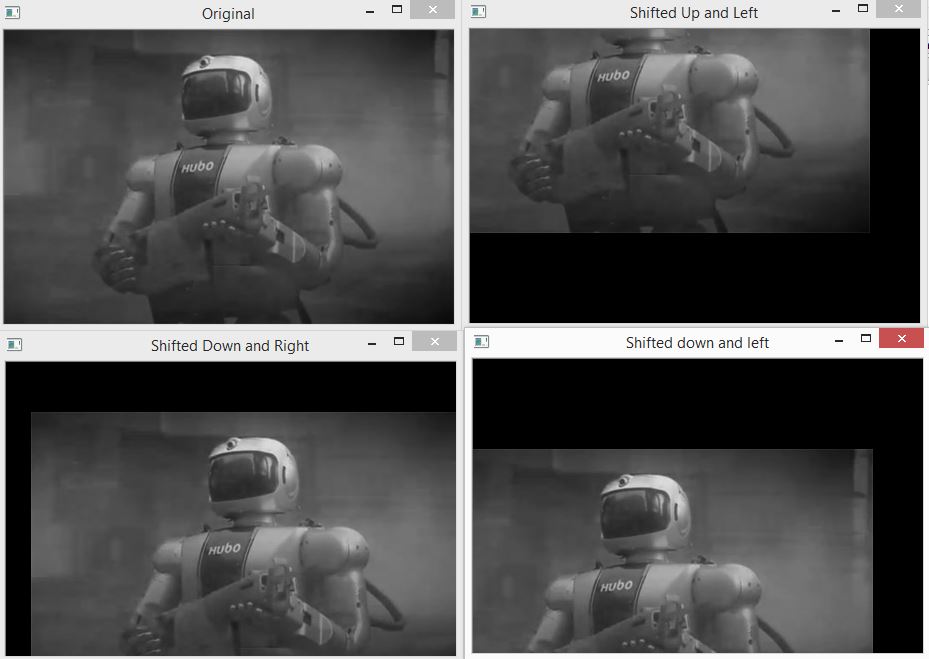
Translation of image
Now with we are going to explore some of the methods of image processing. The first method we are going to learn is the translation of image. Translation is necessary to shift the image up, down, left or right. We can make any combination of that as shifting up and right or down and left etc. The method can be better explained through some codes and its output. Let’s see what the code might be for translation
  import cv2
  import numpy as np
  image = cv2.imread('hubo.jpg',0)
  cv2.imshow("Original", image)
  M = np.float32([[1, 0, 25], [0, 1, 50]])
  shifted = cv2.warpAffine(image, M, (image.shape[1], image.shape[0]))
  cv2.imshow("Shifted Down and Right", shifted)
  M = np.float32([[1, 0, -50], [0, 1, -90]])
  shifted = cv2.warpAffine(image, M, (image.shape[1], image.shape[0]))
  cv2.imshow("Shifted Up and Left", shifted)
  M = np.float32([[1, 0, -50], [0, 1, 90]])
  shifted = cv2.warpAffine(image, M, (image.shape[1], image.shape[0]))
  cv2.imshow("Shifted down and left", shifted)
  cv2.waitKey(0)
  cv2.destroyAllWindows()
The first two line of the code are just to importing the packages we need to do the translation. So we imported OpenCV and Numpy packages in this code. Then using imread() function of OpenCV we read the image from our working folder. You have to make sure the image is within the folder you are working.
Before we do the translation we need to define how many pixels left, right, up or down we to translate out image. So the main translation takes place in next three lines of code where we defined our translation matrix M as a floating point array. The first row of the matrix is [1,0,tx]. Where tx is the number of pixels we want to shift our image left or right. The important thing to remember here is, the positive value of of tx will shift the image to the right, and negative value will shift it to the left.
The second matrix is in the form of [0,1,ty], where ty is the number of pixels we want to shift our image up or down. Negative values of ty will shift the image up and positive values will shift it down. Using this notation we can see we actually want to shift our image 25 pixels right and 50 pixels down. Here tx=25 and ty=50.
Now we have our translation matrix defined and we do the real shifting using cv2.warpAffine function. We can see the function takes three argument. The first argument is the image we want to shift, the second argument is our translation matrix M, and the third is the width and height of the image that we manually supplied. This is important to know that image.shape[1] gives the width of the image in pixel where image.shape[0] gives the height of the image in pixel.
We have done few more translation of the image in the code just to make sure we understand the concept properly. In the second translation we give tx=-50 and ty=-90. The negative value of tx will shift the image 50 pixel left and the negative value of ty will shift the image 90 pixel down. For third translation the value of tx=-50 and ty=90 shifts the image 50 pixel right and 90 pixel down. See the images to understand how translation of images work which will help you to better understand the concept.
